Sit-ups and Russian twists are commonly included in abdominal workouts because they directly challenge the rectus abdominis and oblique muscles. These muscles contribute to the visible definition around the stomach and waist, although noticeable abs also depend heavily on factors such as overall body-fat percentage, nutrition, genetics, sleep, and consistent training.
Despite their popularity, sit-ups and twisting exercises are not comfortable or suitable for everyone. Some people experience lower-back pain while performing them because of poor technique, limited mobility, insufficient core engagement, an existing injury, or individual body mechanics. Repeatedly flexing or rotating the spine can also aggravate discomfort in people who are already sensitive to these movements.
Fortunately, you do not need to rely on sit-ups, crunches, or Russian twists to develop a strong core. A well-rounded core workout should strengthen more than the visible abdominal muscles. It should also train the deeper muscles responsible for spinal stability, posture, balance, breathing, and the controlled transfer of force between the upper and lower body.
One exercise that can help achieve this is the plank knee tuck. It combines the stability demands of a plank with a controlled knee-drive position, allowing you to challenge your abdominal muscles without continuously bending or twisting your spine.
Important: If you are currently experiencing pain, recovering from an injury, or managing a medical condition, speak with a qualified doctor, physiotherapist, or healthcare professional before beginning a new exercise program. General fitness information cannot diagnose an injury or determine whether a particular movement is appropriate for your body.
What Is a Plank Knee Tuck?
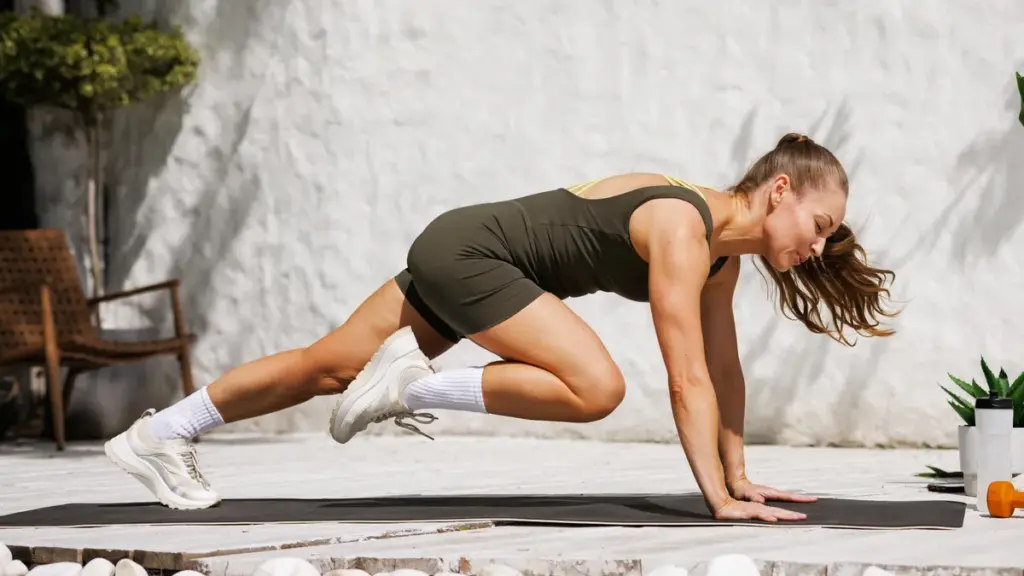
A plank knee tuck begins in a high-plank position, similar to the starting position used for a mountain climber. The main difference is that instead of rapidly alternating your legs, you slowly bring one knee toward your chest and hold it there for several seconds.
The exercise may look simple, but maintaining the position requires significant full-body tension. Your hands press firmly into the floor, your shoulders remain stable, your upper back stays active, and your abdominal muscles work to prevent your hips and spine from rotating or collapsing.
As you bring the knee forward, the objective is not simply to move the leg. You should actively pull the knee toward your chest while keeping the rest of your body as controlled as possible. This creates an isometric contraction, meaning your muscles produce tension while holding a relatively fixed position.
Which Muscles Do Plank Knee Tucks Work?
Plank knee tucks primarily challenge the muscles surrounding your midsection. They can activate the transverse abdominis, internal and external obliques, and rectus abdominis. The transverse abdominis is one of the deepest abdominal muscles and plays an important role in stabilizing the torso and supporting the spine.
The movement is not limited to your abs. Your shoulders, arms, chest, glutes, quadriceps, and hip flexors must also contribute to maintain the plank and support the raised leg. Because so many areas work together, plank knee tucks function as a full-body stability exercise rather than an isolated abdominal movement.
You will probably feel some effort in your hip flexors while holding the knee forward. This is normal, but you should still feel your stomach working. If the hip flexors completely dominate the exercise, reduce the holding time, bring the knee slightly lower, or practise an easier variation.
How to Do Plank Knee Tucks Correctly
Step 1: Set Up Your Plank
Begin on your hands and knees. Place your hands approximately shoulder-width apart and position your wrists directly underneath your shoulders. Extend both legs behind you until your body forms a straight line from your head to your heels.
Step 2: Brace Your Core
Tighten your stomach as though you are preparing for someone to gently punch your midsection. At the same time, lightly draw your belly button inward without holding your breath. Keep your glutes engaged and avoid allowing your lower back to arch excessively.
Step 3: Push the Floor Away
Press firmly through both hands and slightly round or dome your upper back. This active pushing position creates more space underneath your body and improves shoulder stability. Avoid sinking your chest between your shoulders.
Step 4: Bring One Knee Forward
Slowly draw your right knee forward between your hands and toward your chest. Lift the knee as high as you can without allowing your hips to rotate, your shoulders to collapse, or your lower back to lose its stable position.
Step 5: Hold the Position
Hold the knee-forward position for approximately 10 to 20 seconds while continuing to breathe. Keep pressing through your hands and maintain tension through your stomach, glutes, and supporting leg.
Step 6: Change Sides
Return your right foot to the plank position with control. Reset your posture before bringing your left knee forward. Complete the same holding time on both sides.
Recommended Workout Structure
- Hold each side for 10 to 20 seconds.
- Complete 3 to 5 rounds per side.
- Rest for approximately 20 to 45 seconds between rounds.
- Begin with shorter holds if your technique starts to deteriorate.
Key Technique Tips
Keep Your Shoulders Over Your Wrists
Your shoulders should remain approximately aligned above your wrists throughout the exercise. Allowing your body to move too far backward can reduce the challenge to your core, while shifting excessively forward may place unnecessary pressure on your wrists and shoulders.
Do Not Let Your Hips Rise
Raising the hips makes it easier to bring the knee forward, but it also reduces abdominal tension. Try to keep your hips roughly level with your shoulders while maintaining a strong plank position.
Avoid Rotating Your Torso
As the knee moves forward, your body may naturally try to twist toward the working side. Resist this rotation by pressing evenly through both hands and keeping your hips facing the floor. Preventing movement is one of the main ways this exercise trains core stability.
Continue Breathing
Many people instinctively hold their breath during demanding isometric exercises. Instead, take controlled breaths while maintaining abdominal tension. Try to inhale into the sides and back of your rib cage before exhaling slowly without losing your plank position.
Prioritize Control Over Holding Time
A short, well-controlled hold is more useful than a longer hold performed with poor posture. End the set when your lower back begins to arch, your hips rotate, your shoulders collapse, or you can no longer breathe steadily.
Benefits of Plank Knee Tucks
1. They May Feel More Comfortable Than Repeated Spinal Flexion
Traditional sit-ups repeatedly move the spine through a flexed position, while Russian twists add rotational movement. Some people tolerate these exercises well, but others experience discomfort. Plank knee tucks keep the torso in a more stable position and focus on resisting unwanted movement rather than repeatedly bending or twisting the spine.
This does not automatically make the exercise appropriate for every person with back pain. However, some individuals find plank-based exercises more manageable because the goal is to maintain spinal stability while the arms and legs create movement around the torso.
Helpful Cue
Imagine that you are pushing the floor away from your chest. This creates space underneath your upper body and helps prevent your shoulders and spine from collapsing.
2. They Strengthen the Deep Core Muscles
The core is not a single muscle. It is a coordinated system that includes the abdominal muscles, diaphragm, pelvic-floor muscles, spinal stabilizers, and other supporting structures around the hips and torso. Plank knee tucks challenge these muscles to work together while you maintain balance and continue breathing.
The exercise is particularly effective as an anti-extension and anti-rotation movement. This means your core works to prevent your lower back from arching and your torso from twisting as the knee moves away from the starting plank position.
Helpful Cue
Brace your stomach as though you are preparing for impact. Keep that tension while gently drawing your navel inward and breathing steadily.
3. They Build Shoulder Stability
Because your upper body supports much of your weight, the shoulders, chest, upper back, and arms must remain active throughout the exercise. Pressing into the floor and maintaining a strong shoulder position can help develop stability that carries over to push-ups, planks, crawling patterns, and other upper-body exercises.
4. They Improve Balance and Coordination
Lifting one leg reduces the number of contact points supporting your body. Your core must respond by controlling your weight and preventing your hips from shifting. This helps train balance, coordination, and awareness of your body position.
5. They Can Support Athletic Movement
The knee-drive position appears in many activities, including running, sprinting, climbing, hiking, stair climbing, step-ups, high knees, and hurdling. Although a plank knee tuck is not identical to performing these activities while standing, it develops the ability to bring one knee forward while keeping the torso stable.
Improved trunk stability may also help your body transfer force more efficiently between the upper and lower body. This can be useful during strength training, recreational exercise, and everyday movement.
6. They Are Easy to Progress or Modify
The exercise can be adjusted according to your current ability. Beginners can practise from a tabletop position or use shorter holds, while more experienced exercisers can increase the holding time, introduce controlled pulses, add knee taps, or use a resistance band.
Beginner Modifications
Tabletop Knee Tuck
Start on your hands and knees with your wrists under your shoulders and your knees under your hips. Lift one knee slightly away from the floor and bring it toward your chest while keeping your back stable. This version reduces the amount of body weight you must support.
Elevated Plank Knee Tuck
Place your hands on a stable bench, exercise box, or sturdy countertop. Step your feet backward into an inclined plank and slowly bring one knee forward. Elevating your hands decreases the overall load and may make it easier to maintain proper alignment.
Shorter Isometric Holds
Instead of holding the knee forward for 10 to 20 seconds, begin with approximately five seconds. Return to the plank, reset your position, and repeat. Gradually increase the duration as your control improves.
Forearm Variation
You can perform the exercise from your forearms if placing weight through your hands is uncomfortable. However, there will be less space underneath your torso, so your knee may not travel as far forward. Focus on maintaining tension rather than forcing a large range of motion.
Advanced Plank Knee Tuck Variations
Add Small Pulses
Once your knee reaches the forward position, perform several small, controlled pulses toward your chest. The movement should remain subtle and should not cause your hips or shoulders to bounce.
Use Different Touch Points
Bring the knee toward different areas of your upper body. For example, move the left knee toward the left wrist, right wrist, left elbow, right elbow, or armpit. Changing the direction increases the rotational challenge and engages the oblique muscles differently.
Add a Resistance Band
Place a small loop resistance band above your knees. The band creates additional tension as you move one leg forward and forces the hips and core to work harder to maintain alignment.
Increase the Holding Time
Gradually extend your hold from 10 seconds to 20 or 30 seconds, provided you can maintain proper technique and normal breathing. Longer is not always better, so stop the set when your posture begins to change.
Common Plank Knee Tuck Mistakes
Holding Your Breath
Breath-holding can create unnecessary tension and may prevent you from developing control under load. Use slow, deliberate breaths and shorten the set if you cannot breathe comfortably.
Allowing the Lower Back to Sag
A sagging lower back often occurs when the abdominal muscles and glutes lose tension. Return the foot to the floor, reset your plank, and reduce the duration of the next hold.
Lifting the Hips Too High
Raising the hips may make the exercise easier, but it changes the movement and reduces the demand on the abdominal muscles. Keep your body as close to a straight plank line as your mobility and strength allow.
Rushing Into the Position
Driving the knee forward too quickly can create momentum and make it harder to control the pelvis. Move slowly enough that you can pause at any point without losing your balance.
Collapsing Through the Shoulders
Do not allow your chest to sink toward the floor. Press actively through your palms, spread your shoulder blades slightly, and maintain a strong upper-back position.
Ignoring Pain
Muscular effort and mild fatigue are expected, but sharp, pinching, radiating, or increasing pain should not be ignored. Stop the exercise and consult a qualified professional if you experience unusual discomfort.
What Happened When I Added Plank Knee Tucks to My Routine?
Plank knee tucks can be particularly useful when you need to reconnect with your core and improve your awareness of full-body tension. Unlike fast abdominal exercises that can be completed using momentum, this movement forces you to slow down and pay attention to your posture, breathing, and muscle engagement.
The most noticeable challenge is often maintaining steady breathing while the body is under tension. Many people unconsciously stop breathing when an exercise becomes difficult. Holding the knee close to the chest while continuing to breathe teaches you to maintain stability without becoming unnecessarily rigid.
Another advantage is that progress is easy to measure. You may begin with holds lasting only five to 10 seconds before gradually increasing the duration. You can also progress by bringing the knee higher, adding small pulses, changing the knee direction, or introducing resistance.
The exercise encourages deliberate movement rather than mindlessly completing a high number of repetitions. Each set becomes an opportunity to practise control, alignment, and breathing. This can make a short set of plank knee tucks feel more productive than performing numerous rushed sit-ups with poor technique.
How to Add Plank Knee Tucks to Your Workout
Plank knee tucks can be included near the beginning of a workout as a core-activation exercise, placed within a strength-training circuit, or performed at the end of a session as a short abdominal finisher. Because the movement also challenges your shoulders and hip flexors, avoid exhausting these areas immediately before exercises that require high levels of upper-body stability.
Beginner Core Routine
- Tabletop knee tucks: 6 to 8 controlled repetitions per side
- Glute bridges: 10 to 12 repetitions
- Bird dogs: 6 to 8 repetitions per side
- Elevated plank hold: 15 to 20 seconds
Complete two or three rounds while resting as needed between exercises.
Intermediate Core Routine
- Plank knee tuck hold: 10 to 20 seconds per side
- Dead bug: 8 to 10 repetitions per side
- Side plank: 15 to 30 seconds per side
- Glute bridge march: 8 to 10 repetitions per side
Complete three rounds with controlled technique and steady breathing.
Frequently Asked Questions
“`
Are plank knee tucks better than sit-ups?
Neither exercise is universally better because they train the body differently. Sit-ups involve repeated spinal flexion and may place a greater emphasis on moving the torso. Plank knee tucks focus more on maintaining stability while moving one leg. People who find sit-ups uncomfortable may prefer the plank variation, but the best option depends on individual goals, technique, mobility, and injury history.